Smart Flex Onboarding Guide
What is Smart Flex?
How does Smart Flex work?
Attention
Only use Smart Flex machines after onboarding with a trainer. Contact a trainer for onboarding if the lights flash purple when you log on to the machine.
EGYM Smart Flex machines use light and vibration signals to indicate when to exercise and rest. The colored bars flash and the machine vibrates when the next step in the workflow is due to begin.
Circuit mode: The LED signal phases are synchronized so that members can log on, exercise, and switch machines in parallel.
Open mode: Members can start their workout at any available machine (pale blue light).
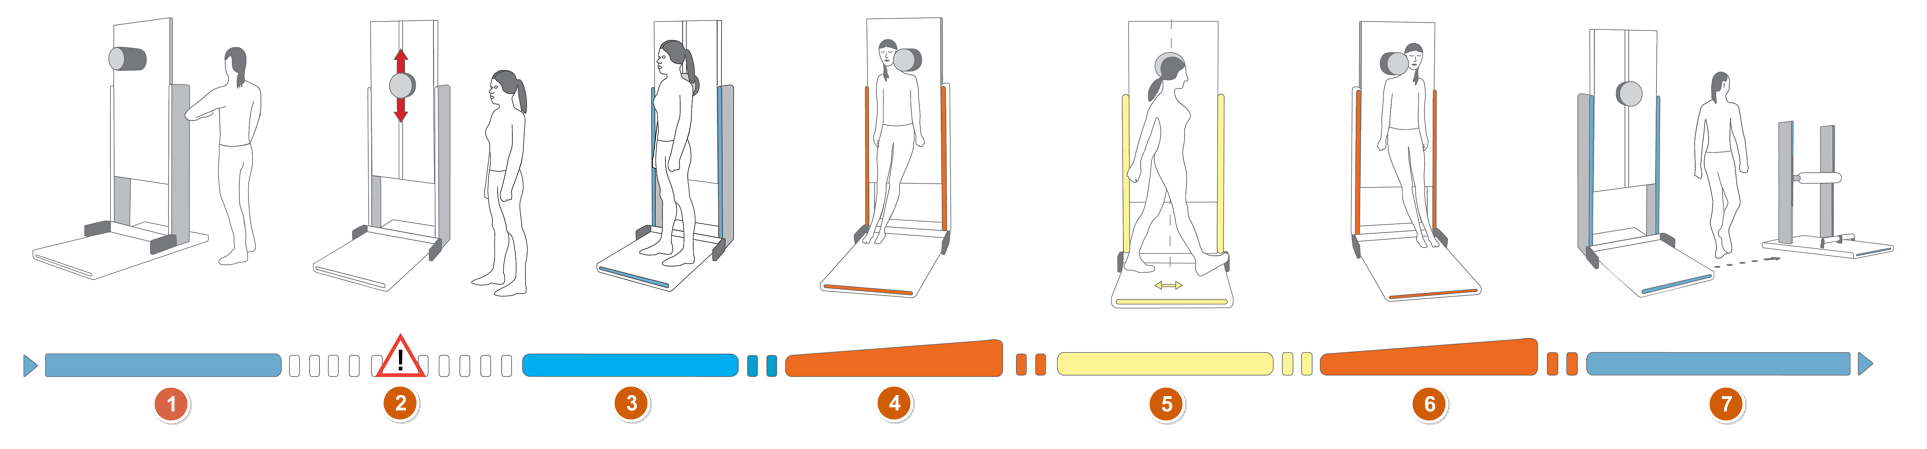 |
LED meaning:
Pale blue: Log on to the machine using an RFID tag.
Flashing white: Wait until the machine setup is complete.
Attention
Do not step on to the machine until the lights turn bright blue.
Bright blue: You are logged in; step onto the machine.
Orange: Start exercising.
Yellow: Rest and switch sides on the machine.
Orange: Start exercising.
Pale blue: Move to the next machine.
Smart Flex Exercises
Focus: The front of the hips, working the hip flexors, thighs, and abdominal muscles.
Benefits: Relieve lower back, glute, and knee discomfort.


Get ready
Kneel on one leg about hip-width apart.
Rest your glutes gently against the back pad.
Place the knee of your kneeling leg against the front pad.
Raise your hands above your head.
Keep your head straight with your chin slightly tucked in.
Start exercising
Keep your hips upright.
Lean your upper body back until you feel a stretch in your front hip.
Press your back foot firmly down toward the floor.
Focus: The front of the chest, working the chest muscles, abdominals, diaphragm, and rib lifters.
Benefits: Improve breathing, relieve tension in the upper body, and promote a more upright posture.


Get ready
Kneel on both legs about hip-width apart.
Place your knees against the front pad and your back against the rear pad.
Raise your hands above your head.
Keep your head straight and your chin slightly tucked in.
Start exercising
Keep your hips upright.
Lean your upper body back with straight arms until you feel a stretch in your chest. Keep your chest open and pulling your shoulder blades together.
Press your legs down firmly toward the floor.
Focus: The back of the thigh and calf, working the hamstrings, calf muscles, and muscles of the foot sole.
Benefits: Relieve pain in the lower back, hips, legs, and feet while improving motor control in the feet. Mobilizing the hamstrings also reduces tension throughout the posterior chain and lowers the risk of a herniated disc.


Get ready
Keep your legs slightly bent without locking your knees.
Grip the wedge with your toes.
Position your hips directly above your feet.
Bend your upper body forward keeping a straight back and tilting your pelvis forward. Grab the handle with both hands or rest your forearms on the handle.
Keep your head straight and in line with the spine with your chin slightly tucked in.
Start exercising
Continue tilting your upper body and pelvis forward, aiming for about a 90° angle at the hip.
Lower the heels of your feet toward the ground and hold the stretch.
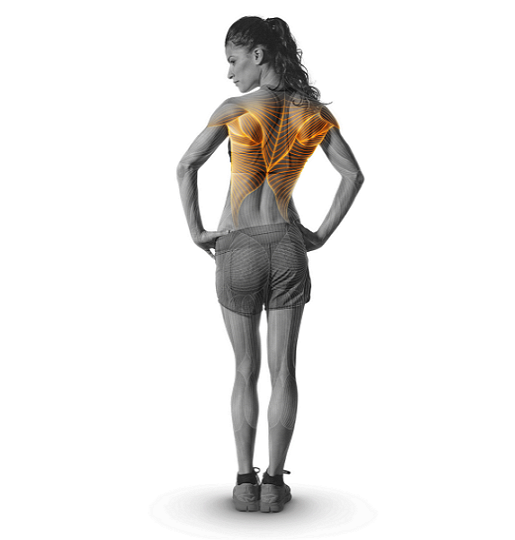
Focus: The side of the torso, working the latissimus, oblique abdominal muscles, and rib lifters.
Benefits: Relieve tension and pain in the lower back and neck, and reduce discomfort in the lumbar spine.

Get ready
Stand with your legs straight and feet together.
Maintain as much contact with the wall of the device as possible. Your hip should rest against the roller pad.
Raise your arms above your head. With your inner hand, hold on to the wrist of your outer arm.
Keep your head straight with your chin slightly tucked.
Straighten your pelvis.
Start exercising
Bend your upper body sideways as far as possible and hold the position.
Press your outer heel firmly into the ground, maintaining full foot contact.
Focus: The front of the thigh, working the quadriceps, hip flexors, and abdominal muscles.
Benefits: Relieve tension and discomfort in the hips, knees, and lower back.


Get ready
Kneel with your knees hip-width apart, keeping your pelvis upright.
Hold the resistance band in front of you, pulling it tight while keeping your body straight.
As you lean your upper body slightly backward, extend your arms forward.
Keep your head straight with your chin slightly tucked.
Start exercising
Keep your shoulders and hips aligned. Think of your body like a solid board.
Lean your upper body back as far as possible, pivoting only at the knees.
Press your lower legs firmly toward the floor and hold the position.
Focus: The front and side of the neck.
Benefits: Mobilize the cervical spine and jaw joint and reduce tension-related headaches.


Get ready
Stand at the edge of the machine with your heels against the back wall.
Stand with your legs straight and feet together.
Maintain as much contact with the wall of the device as possible.
Look forward, without lowering your chin.
Press your ear and cheek against the roller pad.
Start exercising
Shift your pelvis to the inside while maintaining tension in the neck muscles.
Extend the arm with the weight downward toward the floor.
Focus: The back of the thigh and the hip, working the calf muscles, hamstrings, and hip muscles.
Benefits: Relieve tension in the hip and lower back areas.


Get ready
Kneel on one knee about hip-width apart.
Place your front heel on the sliding platform and press it into the pad to create tension while sliding the leg forward. Keep your front knee slightly bent.
Maintain an upright upper body, and avoid rotating your hips.
Hold the handles for support.
Start exercising
Keep your pelvis upright throughout the entire movement.
Press your front heel firmly toward the floor to increase the stretch and maintain tension. Avoid rotating your foot and keep your foot upright.
Focus: The gluteal region, working the gluteal muscles, hamstrings, and external hip rotators.
Benefits: Relieve pain from an irritated sciatic nerve and improve mobility.


Get ready
Place the front leg on the pad with the knee and calf resting on the surface, angled across the body, keeping the hips facing forward.
Position the ball of your back foot on the sliding platform.
Keep your upper body upright and brace your core.
Rest your hands on the supports.
Start exercising
Push the sliding platform backward while keeping your knee bent.
Lower your hips below your front knee, and maintain tension in the gluteal muscles.
Because most people wear shoes daily, the feet receive limited sensory input. Training the soles with different tactile surfaces enhances neuromuscular coordination and myofascial function helps prevent injuries and reduces common foot problems.
This exercise focuses on training the muscles and fascia of the foot sole.
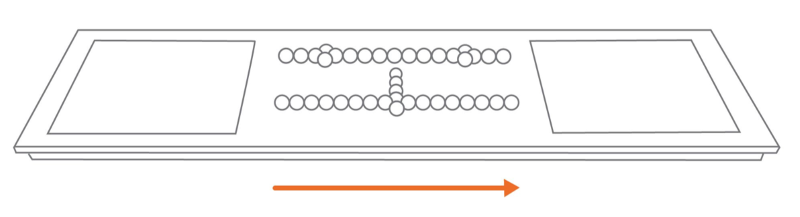
Exercise instructions
Take off your shoes.
Start by standing flat on the small wooden pegs; gradually move to the stone surface as you adapt.
Vary your stance to engage different parts of your foot. For example, try standing on your toes or on the balls of your feet.