Flexibilitätstests durchführen
Befolge einfach die Anweisungen, um dich richtig hinzustellen.
Befolge die Anweisungen zum Durchführen der Kniebeuge.
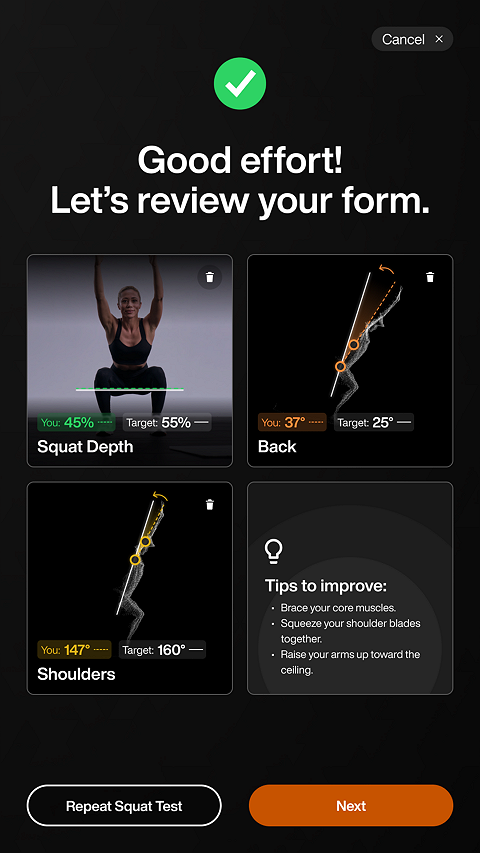
Schau dir deine Ergebnisse im Vergleich zu den Zielen an. Klicke auf Weiter oder auf Kniebeugentest wiederholen
Anmerkung
Wenn du bei der Tiefe deiner Kniebeuge weit vom Zielwert abweichst, könnte das auf Probleme mit der Beweglichkeit in Knöchel, Hüfte und Knie hindeuten.
Eine starke Abweichung vom Zielwert im Rückenbereich kann auf eine eingeschränkte Beweglichkeit in den Sprunggelenken oder Hüften, ein Problem mit dem Körperschwerpunkt (Verhältnis Oberschenkel zu Oberkörper) oder eine schwache Rumpfmuskulatur hinweisen.
Eine große Abweichung vom Zielprozentsatz bei deinen Schultern kann auf eine eingeschränkte Beweglichkeit der Schultern oder eine Steifheit der Brustwirbelsäule hindeuten.
Anmerkung
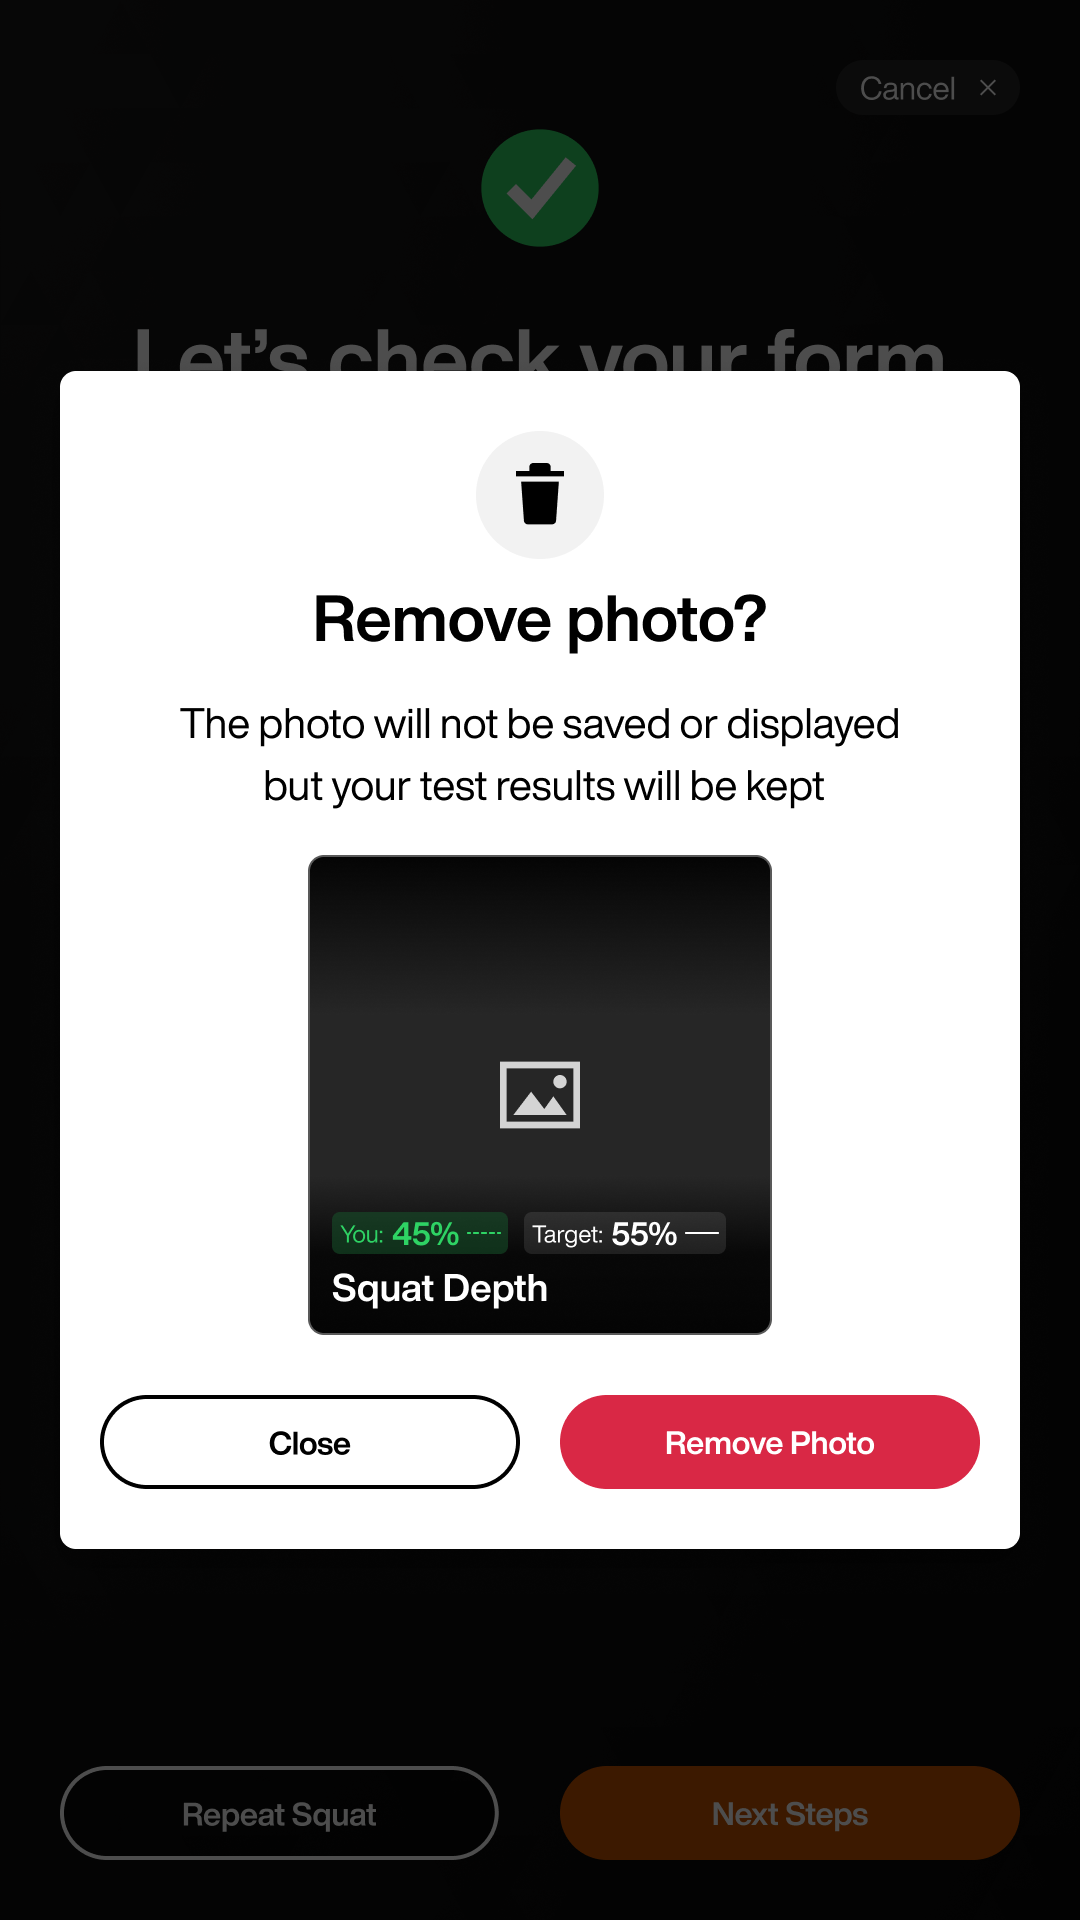
Wenn du eines der Bilder löschen willst, tipp einfach auf das Löschsymbol im Bild. Tippe im Popup-Fenster auf Foto entfernen.
Schau dir die Empfehlungen an, um deine Kniebeuge zu verbessern, und tippe auf Weiter.

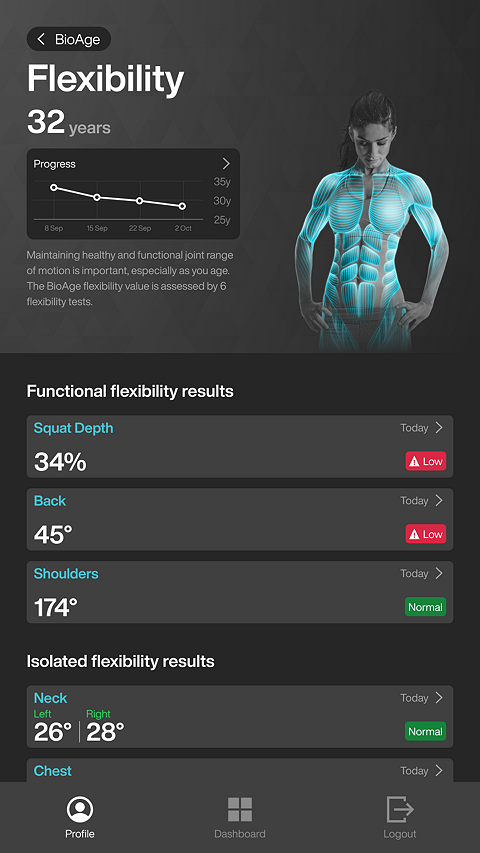
Schau dir dein BioAge für Flexibilität an, das auf deinen Kniebeugentest-Ergebnissen basiert. Wähle BioAge entdecken aus, um mehr zu erfahren.

Du siehst deine Prozentsätze der Flexibilität und eine Bewertung mit „Niedrig“, „Normal“ oder „Ausgezeichnet“. Tippe auf Heute > für Tiefe der Kniebeuge, Rücken und Schultern, um genauere Anweisungen zu bekommen. Tippe auf < BioAge, um zum deinen BioAge-Ergebnissen zurückzukehren.
Anmerkung
Wenn du noch nie einen Kniebeugetest gemacht hast, wirst du dazu aufgefordert, einen zu machen.
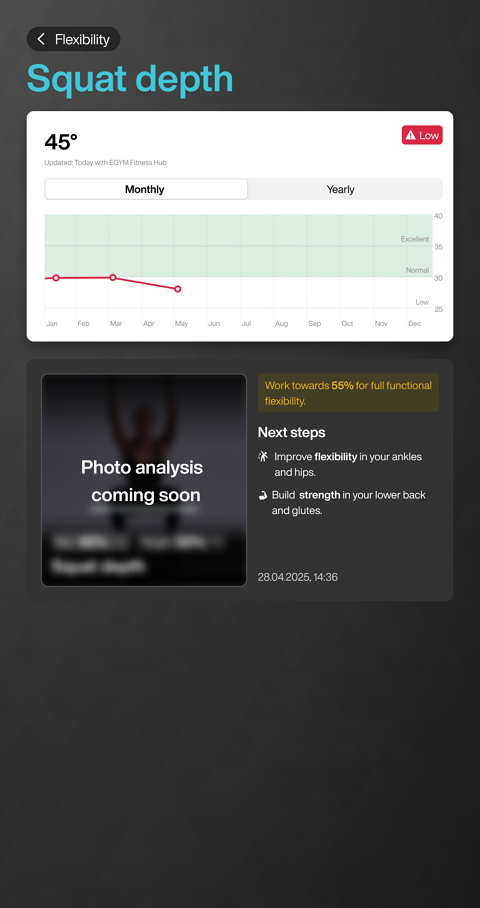
Schau dir deine Ergebnisse und Empfehlungen für Tiefe, Rücken und Schultern an. Tippe auf Flexibilität, um zu deinen Flexibilitätsergebnissen zurückzukommen.
Anmerkung
Du kannst deine Trainingspräferenzen bei Bedarf anpassen. Wenn du ein Trainingsprogramm auswählst, kannst du den Schieberegler für die prozentuale Flexibilität einstellen.
Wähle Abmelden.
Gemessene Muskeln
Folgende wichtige Muskeln werden während des Brustflexionstests gemessen:
Primärmuskeln
Brust
M. pectoralis major
M. pectoralis minor
Bauch
M. rectus abdominis
Sekundärmuskeln
Bauch
M. obliquus externus abdominis
M. internus abdominis
M. transversus abdominis
Zwerchfell (diaphragma)
Rippenheber
M. levatores costarum
Auswirkung auf das tägliche Leben
Die Brustmuskulatur ist für die Bewegung des Oberkörpers und die Stabilisierung des Schultergelenks zuständig. Eine gekrümmte Körperhaltung, z.b. aufgrund von sitzenden Büroarbeiten, führt langfristig zu einer Verkürzung dieser Muskulatur, was zu Haltungsschäden und Schmerzen in der Halswirbelsäule und Schulterproblemen führen kann.
Trainingsempfehlungen
Smart Flex: Nutze das Smart Flex Brust Gerät, um die Flexibilität der Brustmuskulatur und Atemhilfsmuskulatur zu verbessern. Die Brustmuskulatur wird in die Länge trainiert, was zu einer gesünderen Körperhaltung führt und schlussendlich Schmerzen im Rücken und Nacken reduzieren kann.
Keine Hilfsmittel erforderlich: Brust an der Wand stehend dehnen.
Anweisungen
Halte den Flexibilitätsstab waagerecht vor dir in beiden Händen.
Stelle dich aufrecht und schulterbreit und führe den Stab mit gestreckten Armen über deinen Kopf.
Strecke nun die Arme so weit wie möglich nach hinten.
Halte diese Position, bis Fitness Hub die Messung abgeschlossen hat.
Video-Demo
Gemessene Muskeln
Folgende wichtige Muskeln werden während der Beinextension bei zusätzlicher Hüftflexion gemessen:
Musculus Ischiocrurale
Musculus biceps femoris
Musculus semimembranosus
Musculus semitendinosus
Auswirkung auf das tägliche Leben
Die Muskulatur der Oberschenkelrückseite, auch ischiocrurale Muskulatur (od. “Hamstrings”) genannt, beschreibt eine Muskelgruppe, welche für die Beugung im Kniegelenk und Streckung im Hüftgelenk verantwortlich ist. Leider neigt diese Muskelgruppe aufgrund von im Alltag auftretender falscher Haltungsmuster, wie z.B. langes Sitzen oder fehlender sportlicher Betätigung zu einer Verkürzung. Diese Verkürzung kann sich auf die gesamte Faszienkette der Körperrückseite auswirken und Rückenschmerzen begünstigen. In extremen Fällen kann sie sogar Bandscheibenvorfälle verursachen.
Trainingsempfehlungen
Smart Flex: Mit unserem Muskellängentraining an den Smart Flex Geräten kann der Bewegungsumfang der ischiocruralen Muskulatur effektiv verbessert werden. Es empfehlen sich die Übungen Smart Flex Waden und Smart Flex Spagat.
Anweisungen
Stelle dich frontal vor den Fitness Hub, sodass sich deine Füße mit den Markierungen decken und Fitness Hub dich erkennt.
Drehe dich anschließend wie im Video gezeigt, um 90 Grad.
Folge nun den Anweisungen auf dem Fitness Hub zur korrekten Fußpositionierung.
Beuge dich mit dem Oberkörper so weit es geht nach vorne, achte dabei auf einen geraden Rücken und ein durchgestrecktes, nicht gebeugtes Knie.
Halte diese Position, bis Fitness Hub die Messung abgeschlossen hat.
Wiederhole die Schritte 3-5 entsprechend den Anweisungen auf dem Bildschirm für die andere Seite.
Tipp
Für eine erhöhte Dehnung der Hamstrings ( Beinbeuger) können die Zehen zum Schienbein gezogen werden (Dorsalextension)
Video-Demo
Gemessene Muskeln
Folgende wichtige Muskeln werden während der Hüftextension gemessen:
Primär:
Musculus Iliopsoas
Musculus Psoas Major
Musculus Psoas Minor
Musculus iliacus
Rectus femoris
Sekundär:
Quadriceps femoris
Rectus abdominis
Auswirkung auf das tägliche Leben
Der Hüftbeuger wird bei vielen Bewegungen im Alltag beansprucht, etwa beim Gehen, Laufen oder Treppensteigen. Bei vielen Menschen ist der Muskel jedoch verkürzt, vor allem, wenn sie viel sitzen. Regelmäßige schmerzen im Rücken können auf eine Verkürzung des Hüftbeugers hindeuten.
Trainingsempfehlungen
Smart Flex: Mit dem EGYM Flex Hüfte verlängerst du deinen Hüftbeuger. Das fördert eine aufrechte Körperhaltung und entspannt den unteren Rückenbereich.
Keine Hilfsmittel erforderlich: Hüftbeuger dehnen kniend
Anweisungen
Stelle dich frontal vor den Fitness Hub, sodass sich deine Füße mit den grünen Markierungen decken und Fitness Hub dich erkennt.
Drehe dich anschließend wie von Fitness Hub angezeigt um 90 Grad zu der einen Seite.
Folge den Anweisungen von Fitness Hub zur korrekten Positionierung deiner Füße.
Beuge deinen Oberkörper so weit wie möglich nach hinten. Achte darauf, dass die Hüfte dabei gerade bleibt und nicht eingedreht wird.
Halte diese Position, bis Fitness Hub die Messung abgeschlossen hat.
Wiederhole die Schritte 3–5 entsprechend den Anweisungen auf dem Bildschirm für die rechte Seite.
Tipp
Po und Bauch anspannen— > Becken richtet sich auf
Video-Demo
Gemessene Muskeln
Folgende wichtige Muskeln werden während der Lateralflexion gemessen:
Latissimus dorsi
Quadratus lumborum
Obliquus externus und internus
Auswirkung auf das tägliche Leben
Die seitliche Oberkörpermuskulatur beugt, dreht und stabilisiert deinen Rumpf. Steifigkeit in diesem Bereich oder ein eingeschränkter seitlicher Bewegungsspielraum kann Schmerzen der Lendenwirbelsäule verursachen. Darüber hinaus können die Ausdehnung des Zwerchfells und des Brustkorbs eingeschränkt werden, was eine normale Atmung behindert.
Trainingsempfehlungen
Smart Flex: Mit dem EGYM Flex Lat Flex kannst du deine seitliche Oberkörpermuskulatur sicher und effektiv verlängern. Mit der neu erlangten Beweglichkeit und verringerten Muskelverspannung reduziert sich der Druck auf deine Wirbelsäule und du kannst wieder frei atmen.
Keine Hilfsmittel erforderlich: Latissimus Dehnen seitlich
Anweisungen
Halte den Flexibilitätsstab waagerecht vor dir in beiden Händen.
Stehe aufrecht und hebe den Stick mit gestreckten Armen über den Kopf.
Neige deinen Oberkörper so weit wie möglich nach links.
Dein Oberkörper darf sich dabei nicht nach vorne oder hinten beugen und deine Schultern und Hüften müssen parallel zum Bildschirm ausgerichtet sein.
Halte diese Position, bis Fitness Hub die Messung abgeschlossen hat.
Wenn du dazu aufgefordert wirst, nimm deine Grundstellung wieder ein.
Wiederhole die Schritte 1–6 entsprechend den Anweisungen auf dem Bildschirm für die andere Seite.
Video-Demo
Gemessene Muskeln
Folgende wichtige Muskeln werden während des Nackentests gemessen:
Scaleni
Oberer Trapezius
Levator scapulae
Suboccipitales
Auswirkung auf das tägliche Leben
Die seitlichen Nackenmuskeln stabilisieren und bewegen deinen Kopf. Länger anhaltende Belastung oder stilles Sitzen über lange Zeiträume, wie bei der Arbeit am Computer, können die Beweglichkeit verringern. Dies führt zu Kopfschmerzen, Muskelschmerzen durch Verspannung, Kieferpressen oder Schmerzen der Halswirbelsäule.
Trainingsempfehlungen
Smart Flex: Mit dem Smart Flex Hals kannst du deine seitlichen Nackenmuskeln dehnen. Durch die verringerte Muskelspannung entspannt sich der Bereich um die Halswirbelsäule.
Keine Hilfsmittel erforderlich: Nacken Dehnen seitlich
Anweisungen
Halte den Flexibility Stick, wie im Video gezeigt, in einer Hand senkrecht zum Boden. So hältst du leichter das Gleichgewicht.
Neige deinen Kopf so weit wie möglich nach links.
Dein Oberkörper darf sich dabei nicht nach links oder rechts neigen und deine Schultern und Hüften müssen parallel zum Bildschirm ausgerichtet sein.
Halte diese Position, bis Fitness Hub die Messung abgeschlossen hat.
Wenn du dazu aufgefordert wirst, nimm deine Grundstellung wieder ein.
Wiederhole die Schritte 1–5 entsprechend den Anweisungen auf dem Bildschirm für die rechte Seite.